Add a Tax
This is where you add the various taxes that will be used by the system as well as setting up how these taxes will be applied.
IMPORTANT: You should include every individual tax that could ever apply even if the tax is sometimes not charged or if some customers are exempt from it.
From the Lynx Main Menu . . .
1. Left-click on Bookkeeping and a drop down menu will appear.
2. Left-click on Accounts Receivable.
3. Left-click on Add, Change, Delete Taxes to display the Add, Change, Delete Taxes window showing all of the taxes you have already set up.
4. Left-click the  button.
5. Left-click in the Tax ID text box and key in the number you want to assign to the tax.
Note: Make sure that the Tax ID number is unique. That is, each tax should have a different ID number.
6. Use the  key to
navigate through each of the other text boxes (Tax Name, Tax Rate, and the General Ledger Liability Account
Number) and key in the relevant information.
key to
navigate through each of the other text boxes (Tax Name, Tax Rate, and the General Ledger Liability Account
Number) and key in the relevant information.
Note: The Tax Rate is keyed in as a whole number. That is, if the rate is 6.5 percent, it is keyed in as 6.5 and NOT as .065.

When products are sold that include taxes (like a state sales tax, for instance) that tax amount will automatically be held in the Liability Account you entered here. Then, when the tax is paid, this account is "emptied" and the amount paid to the appropriate government entity.
If you're using the General Ledger, it is recommended that you set up a separate Liability Account for each tax.

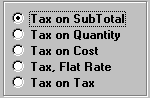
7. Left-click the appropriate radio button to indicate how this tax is applied:
8. If applicable, left-click the  button to add or delete taxes that are applied on
top of other taxes.
button to add or delete taxes that are applied on
top of other taxes.
9. When you're done adding the new tax, left-click the  button. To add another new tax, return to step 5 above.
10. When you're done adding new taxes, left-click the close button  to return to the Lynx Main Menu.