Add a Customer
Here's how to add a new customer to the system. This process will automatically lead you through the necessary screens to insure that all of the information required to set up a new account is complete.
From the Lynx Main Menu . . .
1. Left-click on Customers.
2. Left-click on Add a Customer.
3. This will display the Add, Change, Delete Customers window.
From the Add, Change, Delete Customers window . . .
1. Use the  key to go
through each field and key in the appropriate information.
key to go
through each field and key in the appropriate information.

The system will automatically generate an account number for you to use. However, you can key in your own account number if you like. The system will insure that your number is not a duplicate.

2. When you're done, left-click the  button.
3. This will display the Account Preferences tab window.
From the Account Preferences tab window . . .
1. Use the key to go
through each field and key in the appropriate information.
2. When you're done, left-click the  button.
3. This will display this window:
4. Left-click the  button.
5. This will display a window for adding a tank to this new account:

6. Left-click  if you do NOT want to add a tank.
7. Left-click either  ,
,  , or
, or  to add a tank.
For help on adding a dummy tank to the customer account, see Add a Dummy Tank to an Account.
If you're adding a Customer Owned tank
1. This window will be displayed:
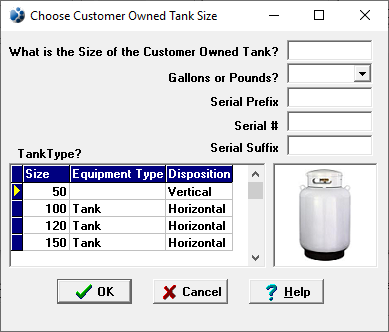
2. Key in the size (in gallons) of the Customer Owned tank.
3. Left-click the  button.
If you're adding a Company Owned tank
1. The Add or Remove a Tank window will be displayed.
2. Left-click on the tank in the right hand column to be added to the account.
Company owned tanks are ALWAYS added to a customer account from the Yard File (Account 0).
3. Left-click the  button.
4. To add another company owned tank, return to step 2 above.
5. When you're done, left-click the button.
After you've added the tank (either Customer or Company owned)
1. In either case, the Location Info tab window will appear.
The Location Info tab window
1. Use the key to go through each field and key in the appropriate
information.
2. When you're done, left-click the button.
3. This will display the Routing tab window.
The Routing tab window
1. Use the key to go
through each field and key in the appropriate information.
2. When you're done, left-click the button.
3. This will display the Propane Safety Check tab window.
The Propane Safety Check tab window
1. For help on this, see Overview of Propane Safety Checks.
2. When you're done, left-click the button.
3. This will display the Rent tab window.
The Rent tab window
1. Use the key to go
through each field and key in the appropriate information.
2. When you're done, left-click the button.
3. This will display the Taxes tab window.
The Taxes tab window
1. Left-click the down arrow to display a drop-down list of Tax Groups. When you do this, the individual taxes for that Tax Group will appear below.
2. Left-click the Tax Group for this customer from the list.
3. When you're done, left-click the button.
4. This will display the Meters tab window.
The Meters tab window
1. Use the key to go
through each field and key in the appropriate information.
2. When you're done, left-click the button to return the account screen for this account.