Print General Ledger Reports
Here's how to generate General Ledger reports. The reports will be "previewed" on the screen first and can then be printed.
From the Lynx Main Menu . . .
1. On the Menu Bar, left-click on Reports or left-click the  button.
2. In either case, a drop-down menu will appear. Left-click on General Ledger Reports.

There's also a third way to print General Ledger reports. On the Menu Bar, left-click on Bookkeeping, then left-click on General Ledger, and then left-click on General Ledger Reports.

3. The Choose a General Ledger Report window will now be displayed. As you left-click on each Report ID or Report Name, the description of that report will be shown in the box above.
4. Double-left-click the report you want (or left-click the report and then
left-click the  button).
5. This will display the Format a General Ledger Report window.
6. Select the period you want for the report and whether or not you want zero balance accounts to show.
7. Once you've made your selections, left-click the  button to preview the report on your screen.
8. If you're trying to print certain General Ledger reports (Balance Sheet, Income Statement, GL Account Detail Report, or Trial Balance) and choose periods that contain non-posted batches, you will get this message:
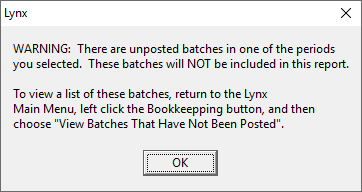
9. If you get this message, go back to the Main Menu and select View Batches That Have Not Been Posted from Bookkeeping. Use this to identify unposted batches and post each one to the General Ledger. Then try printing again. Repeat this, if necessary, until all batches in this period are posted.
10. After your report has successfully appeared on the Print Preview
window, you can left-click the print button  to
print the report or left-click the
to
print the report or left-click the  button to
exit.
button to
exit.
When you first start using the system, it's a good idea to practice choosing and formatting different kinds of reports. This will help you get the "feel" for how you can format your own reports by selecting ranges of data in different combinations.