Enter Deliveries
Delivery tickets/invoices can be added to an existing delivery batch (provided it's still "open") or to a new batch. Here's how it's done.
Note: The following procedure assumes you are using the numeric keypad on the right side of your keyboard. This is a much quicker way to enter invoices because it allows for one-handed keying. To activate the keypad, make sure the Num Lock light is lit by pressing thekey (if it's not already lit). For more detail on this, see How to Use the Numeric Keypad.
1. If you want to enter delivery invoices to an existing batch, start by finding the batch. This can be done in two different ways:
2. If you want to enter delivery invoices to a new batch, use the Add a Delivery Batch procedure.
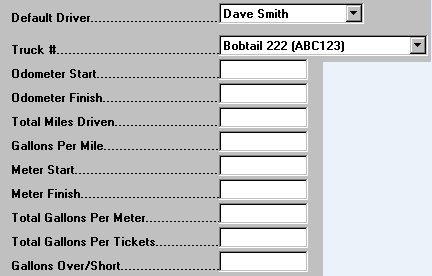
3. In either case you will be at the Enter Deliveries window. Select from the drop-down lists or move the cursor (or Tab) to each of the fields and key in that information as appropriate:


The only trucks that will appear on the drop-down list are those that are set up as an Equipment Type of either "Bobtail" or "Boom Truck" or "Service Truck".

4. Left-click on the  tab which will display the Invoice Detail window and press the
  button.
5. The cursor will be positioned in the Invoice # box. If you're entering invoices to an existing batch, the next Invoice # in the batch will be displayed. If it's a new batch, enter the new invoice number.

To speed up the keying (because it will be all numeric), it's a good idea to set the "Find a Customer Default" to "Account #". To do this or to check and see if it's already set this way, left-click the
button and then left-click on View Invoicing Preferences from the drop-down menu. Left-click the Account # radio button (if it hasn't already been selected) like this:

After you're done, left-click the close button
to return to the Enter Invoices window with the Invoice Detail tab window showing.

6. Press the  key which will display the Find a Customer window. Find the account for this invoice and press the
 key.
key.
7. The cursor will be positioned in the  text box. Key in the quantity.
8. If the default product ID displayed is the one you want to use, simply
press the .gif) key. The system will
automatically inset the proper price, description, extend the total, and apply any taxes appropriate to this
transaction. Following this, the cursor will be positioned in the Invoice # box. Left-click the
key. The system will
automatically inset the proper price, description, extend the total, and apply any taxes appropriate to this
transaction. Following this, the cursor will be positioned in the Invoice # box. Left-click the  button and you're ready to enter the next invoice by
returning to step 5 above.

If you want to use a different product than the default product that's shown, press thekey. Then key any character in the Price Code box and a drop-down list of products will appear. Left-click the one you want to use and then press the
key. The system will automatically inset the proper price, description, extend the total, and apply any taxes appropriate to this transaction. Following this, the cursor will be positioned in the Invoice # box. You're now ready to enter the next invoice by returning to step 5 above.

9. When you're done entering all of the deliveries for this batch, print
the batch report by selecting Print Batch Report from the  button drop-down list.
10. Then left-click the close button  to return to the Lynx Main Menu.