How to Handle Cylinder Exchanges
Cylinder exchange involves keeping track of the inventory of cylinders at your customer locations (by tracking pick-ups and deliveries). It also includes invoicing your deliveries and charging monthly tank rent on the cylinders left at each of your customer sites.
SET UP THE CYLINDER EXCHANGE PRODUCTS
1. Set up a "Service" product for each cylinder size to be used as the "pick up" product. This is done for two reasons. First, it will facilitate keeping track of the running inventory of each cylinder size for each customer. Second, it will make entering delivery invoices easier.
For example:
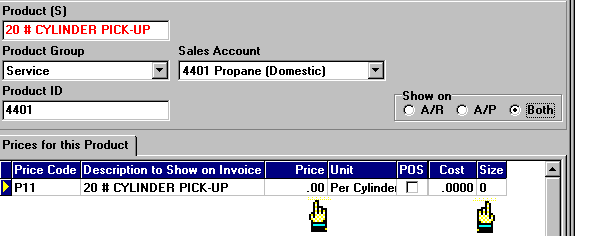

Make sure the "Price" and "Size" for each Price Code are both set to zero. This will insure that the sales and quantity fields are properly calculated.

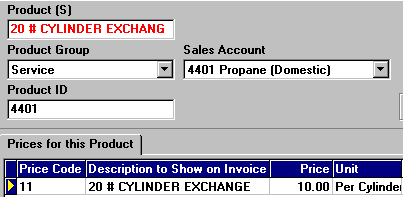
2. For each product set up in step 1 above, set up a corresponding product for each cylinder size to be exchanged. Set these up as a "Service" product and add the appropriate prices for each.
For example:
- See Add a Service Product for help on doing this.
3. For each product set up in step 2 above, add the corresponding "pick up" product set up in Step 1 above as an Assembly Product.
- See STEP 3 of How to Handle Assembly Products for help on this.
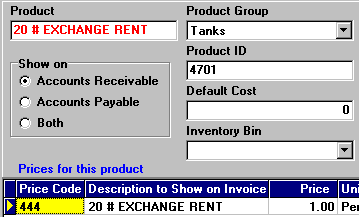
4. Set up a rental product for each cylinder size and add the appropriate prices for each.
For example:
- See Add Tank Rent Information for help on doing this.
FOR THE CUSTOMER
1. Create a company owned tank record for each size cylinder you will exchange at the customers location. Select "Cylinder" as the Tank Type and select either gallons or pounds. Include the customer name and any other pertinent information about this account in the Equipment Description box at the bottom of the window.
- See Add New Tanks to the System for help on doing this.
2. Attach each of these cylinder records to the account.
- See Add a Company Owned Tank to an Account for help on doing this.
3. Assign the default product to each cylinder. This is the appropriate size Service product you set up earlier (in this example, the 20# CYLINDER EXCHANGE shown above).
- See Assign a Default Product for help on this.
4. Assign the appropriate rental product to each cylinder.
Note: Be sure you select "Cylinder Exchange" in the Bill Rent By box.
- See Add Tank Rent Information for help on this.
For new customers, you're done. For a customer who has cylinders already, do the following additional step:
5. Enter the number of cylinders at each customer site. Go to the customer
record and then for each cylinder size, left-click the  tab. Enter the current inventory in this text box
WHEN PICK-UPS AND DELIVERIES ARE MADE
1. After deliveries (and pick-ups) are made they are entered into the system in delivery batches. Deliveries are entered as plus quantities (that is, unsigned numbers) and pick-ups are entered as negative quantities and zero dollars. This is what keeps the running inventory current.
- See Enter Deliveries for help on this.
2. If you use a copy of the delivery ticket as your invoice, you won't need
to print invoices. If you do NOT leave an invoice with the delivery, print invoices now by left-clicking the
 button and selecting Print all Invoices in this batch from the drop down menu.
TO BILL CYLINDER RENT
1. Use the Period-end Billing procedure to generate the bills.
- See Period-end Billing: Generate Rental Charges for help on this.
2. After you have generated the rental charges, find the Rental Charge batch that was just created.
- See Find a Rental Charge Batch by Batch Number for help on this.
3. Check it to make sure its correct and then left-click the button.
4. Left-click Print Batch Report to print a hard copy record of this billing cycle.
5. Left-click Print all Invoices in this batch to print the rental invoices.
TO SEE THE CYLINDER INVENTORY FOR AN ACCOUNT
1. Go to the customers account and left-click the  tab.
tab.
2. If there are multiple cylinder types on this account, find the type you
want to see by left-clicking the  and
and
 buttons.
3. To see how many tanks this account has check the "Tank Count" field
towards the bottom of the window. This will display the current running inventory of tanks for this account,
like this 